All Time Popular Posts

Friday, April 14, 2017

How to Download Adobe Photoshop 2015 Full Version

How to Download Adobe Photoshop 2015 Full Version

Kindly Visit This Link
👇👇👇👇👇👇👇👇👇👇


  • Download the Torrent File
  • After Competition of  that Torrent
  • Disable Your Internet connection.


Step:1 Open the Folder
Step:2 According to your  System type Choose That Folder
64bit
32bit
Step:3 Open It
Then Open Adobe CC 2015
Then Set-up.exe                                                                                          
Step:4 Install Photoshop CC.
For Installation You Can Follow the Images in Installation Screenshots folder
Step:5 After Installation. Launch Photoshop as Trial
Step:6 Close Photoshop
Step:7 Copy the file "amtlib.dll" from Crack folder to Installation directory.
            [C:\Program Files\Adobe\Adobe Photoshop CC 2015\]


 Run the program & Enjoy...!!!

Thank You 
Email- amarjeetsixfive@gmail.com

Thursday, April 13, 2017

How to Unblock Blocked Websites

How to Unblock Blocked Websites


Sometimes you may face problem while accessing some websites either it says this webpage is not available or this website/url has been blocked. If you still want to access a useful website from a place where it is blocked, the best way to access the blocked website  is by using a proxy websites. Proxy sites can open restricted website which are blocked in colleges, schools, government offices, IP restricted etc.

Proxy sites not only help you to access blocked websites, it also help to surf internet anonymously. Proxy sites are very easy to use. They redirect your network traffic through their servers so that you can access those websites because their servers are not blocked to access that site. So here in this tutorial we are providing you the list of top 110 proxy servers.

Here are Top 10 website that break your proxy and give freedom to access that site:-

01.    FilterByPass – https://www.filterbypass.me/
02.    Unlock My Web – http://www.unblockmyweb.com/
03.   Proxy Site – https://www.proxysite.com/
04.    Proxy – http://proxy.org/
05.    Unblocker – https://www.unblocker.us/
06.    Fast USA Proxy – http://fastusaproxy.com/ 
07.    New IP Now – http://newipnow.com/
08.    Anonymouse – http://anonymouse.org/anonwww.html
09.    Hidden Digital Info – http://hiddendigital.info/
10.  K Proxy – http://www.kproxy.com/

Thank You
Enjoy
For any Queries
Email id-amarjeetsixfive@gmail.com


Tuesday, April 11, 2017

How to Activate Windows7 For Free

How to Activate Windows7 For Free

Is your windows is not Genuine???


The activation will be based on Microsoft Key Management Service.Individual Key is not Requried


Simply Download this torrent file
👇👇👇👇👇👇👇👇👇👇👇👇👇👇


Thank you
Enjoy
For Any Queries
Email id- amarjeetsixfive@gmail.com

How to Connect Two Pcs Together with an Ethernet Cable

How to Connect Two Pcs Together with an Ethernet Cable


STEP1:- Verify that you have a crossover Ethernet cable. A crossover Ethernet cable is required to connect computers with Windows OS; whereas a standard Ethernet cable will only establish a connection between a computer and router.
  • ·         Examine the wire color patterns at each end of the Ethernet cable to determine whether or not the colors match up. A crossover Ethernet cable will have color patterns that do not match up; whereas on standard cables, the color patterns will match up to one another identically on each end.


STEP2:-Plug each end of the Ethernet cable into an Ethernet network port on each computer to connect the computers together with the cable.


STEP3:- Go to any one of your computers, and click on the "Start" menu. The "Start" menu often resembles the Microsoft Windows logo on computers running Windows 7.


STEP:-4 Select "Control Panel," then type "network" into the search box provided to you within Control Panel.


STEP:-5 Select "Network and Sharing Center" from the options displayed in the window.


STEP:6 Select and open the icon labeled "Unidentified network" from the network map at the top of the Network and Sharing Center window. This icon may display as "Multiple networks" if you have more than one network.


STEP:-7Click on the message that prompts you to change the network discovery and file sharing settings, then click on the option that reads, "Turn on network discovery and file sharing. "


STEP:-8Type the administrator password for the computer if prompted to do so, then press "Enter" on your keyboard. Both of your computers will now be visible in the Network and Sharing Center window, and you will have the ability to share files and other resources.


Thank you
Enjoy
For any Queries
Email-id amarjeetsixfive@gmail.com

Monday, April 10, 2017

How to find WiFi password in Windows 10

How to find WiFi password in Windows 10

If you are trying to see the password for the network that you’re currently connected to, follow these steps:
  • ·         Right-click the network icon on the toolbar and select “open network and sharing center.”

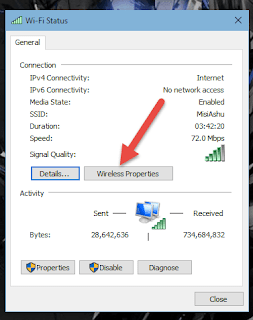
  • ·         In the resulting window, click “Change adapter settings,” right-click on the Wi-Fi network, and select “status” on the drop-down menu.

  • ·         In the resulting pop-up window, select “Wireless Properties,” then click on the Security tab.


  • ·         You should see a check box beside “show characters.” Check this box to reveal your password. (Note: Windows 10 refers to this as a network security key instead of a password.)


Thank you 
Enjoy
For any queries 
email me : amarjeetsixfive@gmail.com

Sunday, April 9, 2017

How To Make Quickly Bootable Usb Drive By Cmd


  1. Insert a USB flash drive into a running computer.
  2. Open a Command Prompt window as an administrator.
  3. Type diskpart.
  4. In the new command line window that opens, to determine the USB flash drive number or drive letter, at the command prompt, type list disk, and then click ENTER. The list disk command displays all the disks on the computer. Note the drive number or drive letter of the USB flash drive.
  5. At the command prompt, type select disk <X>, where X is the drive number or drive letter of the USB flash drive, and then click ENTER.
  6. Type clean, and the click ENTER. This command deletes all data from the USB flash drive.
  7. To create a new primary partition on the USB flash drive, type create part pri, and then click ENTER.
  8. To select the partition that you just created, type select part 1, and then click ENTER.
  9. To format the partition, type format fs=ntfs quick, and then click ENTER.
  10. Type active, and then click ENTER.
  11. Type exit, and then click ENTER.


When you finish Simply Copy the file & paste it into the root of the USB flash drive.


Thank you
Enjoy
For any Queries:
Email- amarjeetsixfive@gmail.com

Friday, April 7, 2017

How to Secure Your Wireless (Wi-Fi) Home Network


Wireless Networking (Wi-Fi) has made it so easy for anyone to use Internet on your computer, mobile phones, tablets and other wireless devices anywhere in the house without the clutter of cable
With traditional wired networks, it is extremely difficult for someone to steal your bandwidth but the big problem with wireless signals is that others can access the Internet using your broadband connection even while they are in a neighboring building or sitting in a car that’s parked outside your apartment.
This practice, also known as piggybacking, is bad for three reasons:
  • It will increase your monthly Internet bill especially when you have to pay per byte of data transfer.
  • It will decrease your Internet access speed since you are now sharing the same internet connection with other users.
  • It can create a security hazard* as others may hack your computers and access your personal files through your own wireless network.

How to Secure Your Wireless Network

The good news is that it is not very hard to make your wireless network secure, which will both prevent others from stealing your internet and will also prevent hackers from taking control of your computers through your own wireless network.
Here a few simple things that you should to secure your wireless network:

Step 1. Open your router settings page

First, you need to know how to access your wireless router’s settings. Usually you can do this by typing in “192.168.1.1” into your web browser, and then enter the correct user name and password for the router. This is different for each router, so first check your router’s user manual.
You can also use Google to find the manuals for most routers online in case you lost the printed manual that came with your router purchase. For your reference, here are direct links to the manufacturer’s site of some popular router brands – Linksys, Cisco, Netgear, Apple AirPort, SMC, D-Link, Buffalo, TP-LINK, 3Com, Belkin.

Step 2. Create a unique password on your router

Once you have logged into your router, the first thing you should do to secure your network is to change the default password* of the router to something more secure.
This will prevent others from accessing the router and you can easily maintain the security settings that you want. You can change the password from the Administration settings on your router’s settings page.

The default login
username:- admin
password:- admin

Step 3. Change your Network’s SSID name

The SSID (or Wireless Network Name) of your Wireless Router is usually pre-defined as “default” or is set as the brand name of the router (e.g., linksys). Although this will not make your network inherently* more secure, changing the SSID name of your network is a good idea as it will make it more obvious for others to know which network they are connecting to.
This setting is usually under the basic wireless settings in your router’s settings page. Once this is set, you will always be sure that you are connecting to the correct Wireless network even if there are multiple wireless networks in your area. Don’t use your name, home address or other personal information in the SSID name.


Thank you
Enjoy
For any quires mail me
Email id- amarjeetsixfive

Having Multiple SIM cards may land you in trouble

Having Multiple SIM cards may land you in trouble Telecom companies has been directed to disconnect services of subscribers who have mor...

All Time Top